
Your basket is currently empty!
How to photograph jewellery
Any jeweller who has ever lived and breathed and worked will know that learning the skill of jewellery-making is hard. It takes years and requires lots of practice… In fact, the learning never seems to stop throughout a jeweller’s career.
On top of being able to make jewellery, modern jewellers are also required to know a thing or two about running a business, gemology, CAD and now also the vast discipline of photography…
Photography seems like it should be the least of a jeweller’s problems, the camera does all the work, right? This is not so, unfortunately. Even seasoned photographers will tell you that photographing jewellery is a different kettle of fish entirely. Camera presets and modes for novices may produce decent results when taking pictures of food and landscapes, but there are no such shortcuts for photographs of jewellery…
Photographers distinguish between landscape photography, sports/action photography, wildlife photography, portrait photography and product photography, to name but a few… Photographing jewellery for a catalogue or online shop is essentially product photography. Models and props are added to show how pieces can be worn and to create a ‘look’ for the brand and for marketing purposes. How you style your photo therefore depends on what you want to use it for, so let us start there:
Why photograph your work?
Marketing
In the past jewellers became known mostly through word-of-mouth advertising. Only larger jewellery businesses could justify the expense of placing an add in a magazine or on a billboard.
Things are very different today, mostly through the advent of the internet and social media. A business without a website almost does not exist in the real world either, and social media platforms are free to use and a great way to engage with potential customers. Social media is geared to display media i.e. photographs and videos. Good images are essential to stand out among all the other entrepreneurs out there, and will hopefully encourage your customers to buy from you…
The hungry social media monster
Creating content for social media is a never-ending task. If you do not constantly update your feeds on Instagram, Facebook, Twitter etc. your loyal followers will forget about you, not to mention ‘the algorithm’, that illusive formula that decides whose images get featured in online searches and when… For a jewellery business this means coming up with a steady stream of ‘content’, i.e. videos and images that showcase their work and create interest in their products.
Social media content need to show products clearly and to their best advantage, but it also needs to convey the image or ‘flavour’ of the product and the business. If the products sold are meant to be bought by a younger demographic for example, then the products can be styled in a playful and edgy way that will catch the attention of young people.
The key here is that the style of both the product, and the way in which it is marketed, should become synonymous with the business’ brand and recognizable over time. Large companies have entire teams that work on this, and each season they launch new campaigns to push their latest stock. Smaller businesses do not have this luxury, and it is often left to business owners themselves to develop the brand.
Online shops and printed catalogues
Photographs for online shops and printed catalogues are different from those used in social media marketing. Here the concern is more to show the product clearly, rather than focusing on the brand of the business and the target market of the product. The overall look and feel of the website will still reflect the brand, but to sell a product from an image, the photo needs to be crisp, clear, and the product must preferably be shown from more than one angle.


Catalogue photo’s often also show at least one image of the piece on a model to give the buyer an idea of scale. The model in these cases are often just parts of a model, like a hand wearing a ring, or the head photographed from the side with earrings in the ears. The model is not important otherwise, and no more is shown than what is necessary for scale.


Portfolio
Another reason to photograph the jewellery you make is to build up a portfolio of your work. A digital portfolio is often required, along with your CV, when applying for work at another business as a jeweller or jewellery designer, or when pursuing opportunities at shops, galleries or as part of curated exhibitions.
A portfolio can also be used if the business is your own, to showcase your work when dealing with customers. A digital or printed album with examples of gems, settings, shanks and sidebands will help with the process of communication with a customer, and is preferable to using magazines that show the work of other jewellers.
The trick with compiling a portfolio is to continually add to it throughout your career, and to discard photographs of your earlier work as your skills improve or as styles change. It is not necessary to have a very large portfolio, but the images you choose should reflect your best work.
There are no rules regarding the style of the images used in a portfolio. The images must show your work clearly of course, but they can also be an opportunity to display your creativity. Extreme close-ups and unconventional angles can be used to great effect, highlighting the beauty of the pieces you make.
For the record…
These are the photographs jewellers use for documents like valuation certificates. Before and after photo’s of repairs, or photo’s of finished make-ups, are also kept in case of a query or dispute later. Photographs for this purpose need to be clear once again, but they don’t have to be perfect. Often these are just a quick snap at the bench. Because they are for the record only, jewellers tend to not waste too much time on styling or editing the photographs.
How to take a photo
After a piece leaves the shop floor or studio, chances are that you will never see it again, and if you do, it will likely not be in pristine condition anymore. It makes sense therefore to take photographs of the pieces you make before they go to their new homes. Deadlines are tight for custom pieces, which is why jewellers often opt to take photographs of bespoke items themselves, rather than send them to professional photographers.
When to use a professional photographer
Professionals are only used when there is enough time for a shoot, and when the pieces justifies the expense. When launching product ranges or ad campaigns, it makes sense to pay an expert to do the job. In these cases, time is set aside and stock is brought to the location where the shoot will take place. Models and stylists may even be involved.
When thinking of hiring a professional photographer, make sure that the person you choose have experience with product photography. As mentioned before, photographing jewellery can be a challenge even for seasoned photographers.
Cameras and smartphones
In time, a jeweller can invest in the proper photographic gear. This may include a camera, macro lenses for taking high resolution close-up images, tents, reflective screens and lighting.
The purpose of this article, however, is to enable jewellers to take their own photographs, even for those just starting out and unable to make the investment. Also, taking a good photograph with a camera on manual mode can be rather technical, and though it is a skill that can be learned in time, starting out with a simpler device and upgrading from there is not a bad idea.
Luckily for jewellers, modern smartphones are fitted with exceptional cameras, enabling jewellers to take high resolution images that are more than good enough for smaller prints and the internet. Another advantage of taking photo’s with your phone is that you can post directly to your social media feeds. In fact, posts to Instagram specifically can only be made from a smartphone. Photo-editing apps for smartphones are becoming more and more sophisticated as well, but more on that in another blog post…
Photo set-up
The ideal is to have a small dedicated space in your workshop for taking photographs. Here your light tent, tripod, lights, backgrounds and jewellery stands should be permanently set up. This way you can quickly take a photograph before a job leaves the studio, without wasting time getting everything out. Also, you can make slight tweaks to the set-up as you figure out what works and what doesn’t, leaving everything in place when you are done for the next shoot.
Lights
One of the more important elements of a photo set-up is the lighting. Ideally one would like daylight-like lighting to illuminate an object. To use actual daylight though is not ideal. For one you can only shoot during the day, and secondly, the intensity and colour of daylight is different from day to day and over the course of the day, depending on the weather and the position of the sun. When you are trying to create a homogeneous look for your brand, it makes sense that you take your photographs in the same lighting conditions every time.
The lamps
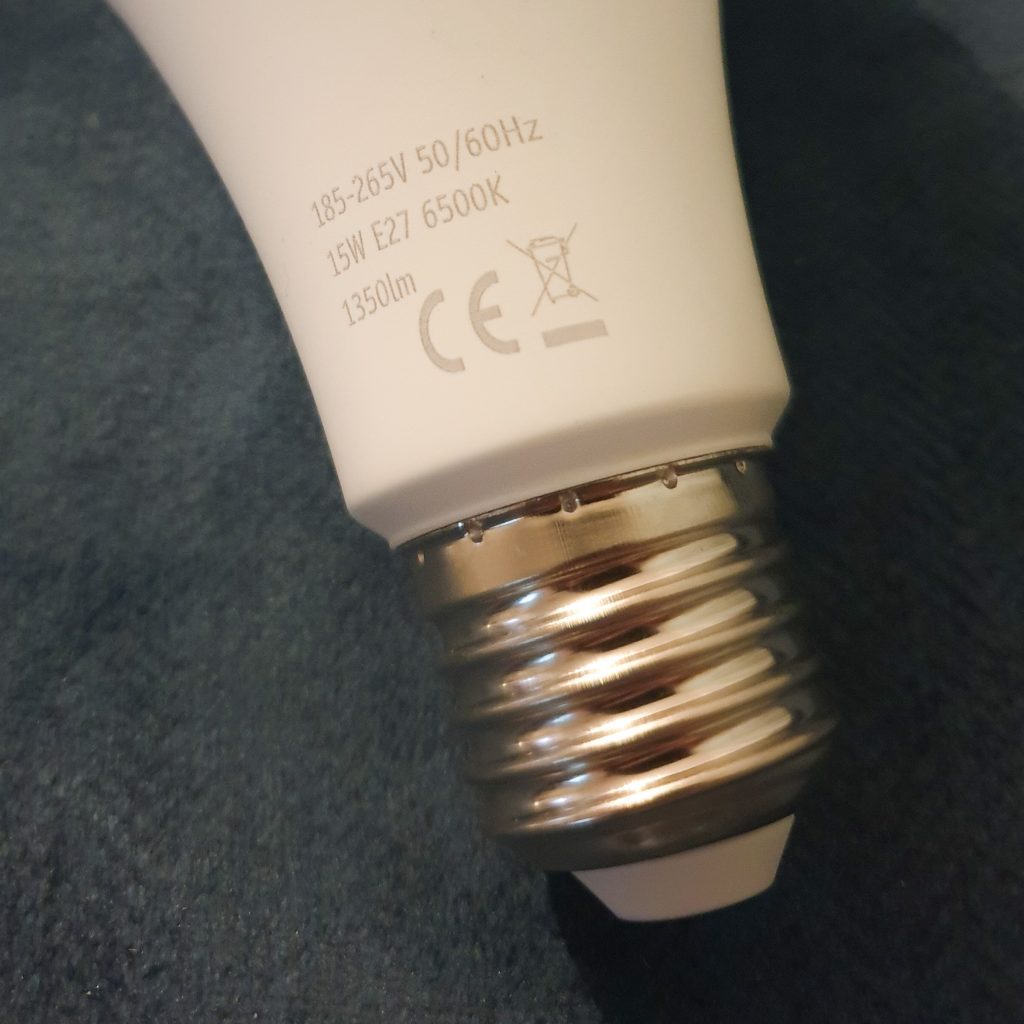
The best alternative to perfect daylight is to have one or more extremely bright lights illuminating the subject. When choosing a bulb for your lamp there are two things to consider: brightness and colour.
On the box, lumens (lm) describe the brightness of a bulb. The higher the number, the brighter the bulb. 1350lm is an extremely bright lightbulb and good for photography.
Degrees Kelvin (K) describes the colour ‘temperature’ of a bulb. The higher the number, the closer to pure white sunlight the colour will be. A bulb that is marked 3500K or less will have a warm white colour and cast a yellowish tint on the pieces you are photographing. Look for a bulb that is closer to 6500K.
The LED bulb pictured below meets all the requirements described above. It is the same size as a normal bulb and only 15W. It screws into a normal desk lamp, no special fittings required.
LED strip lights
Some lightboxes (see below) that you can buy commercially for product photography are fitted with LED strip lights to help light up the inside of the box evenly. Avoid using these. Because metals are reflective, each of the lights will show up as small pin pricks reflections in the metal. Although they can be edited out, the ideal is always to take photos that look as close as possible to what the end result should be. Editing will become unnecessarily time-consuming otherwise.

Another problem with LED strip lights is the colour they cast. Although they are sold in cool white and warm white strips, you do not have control over the temperature of the colour they really emit. Images lit by cool white LED strip lights often turn out bluish or purple.
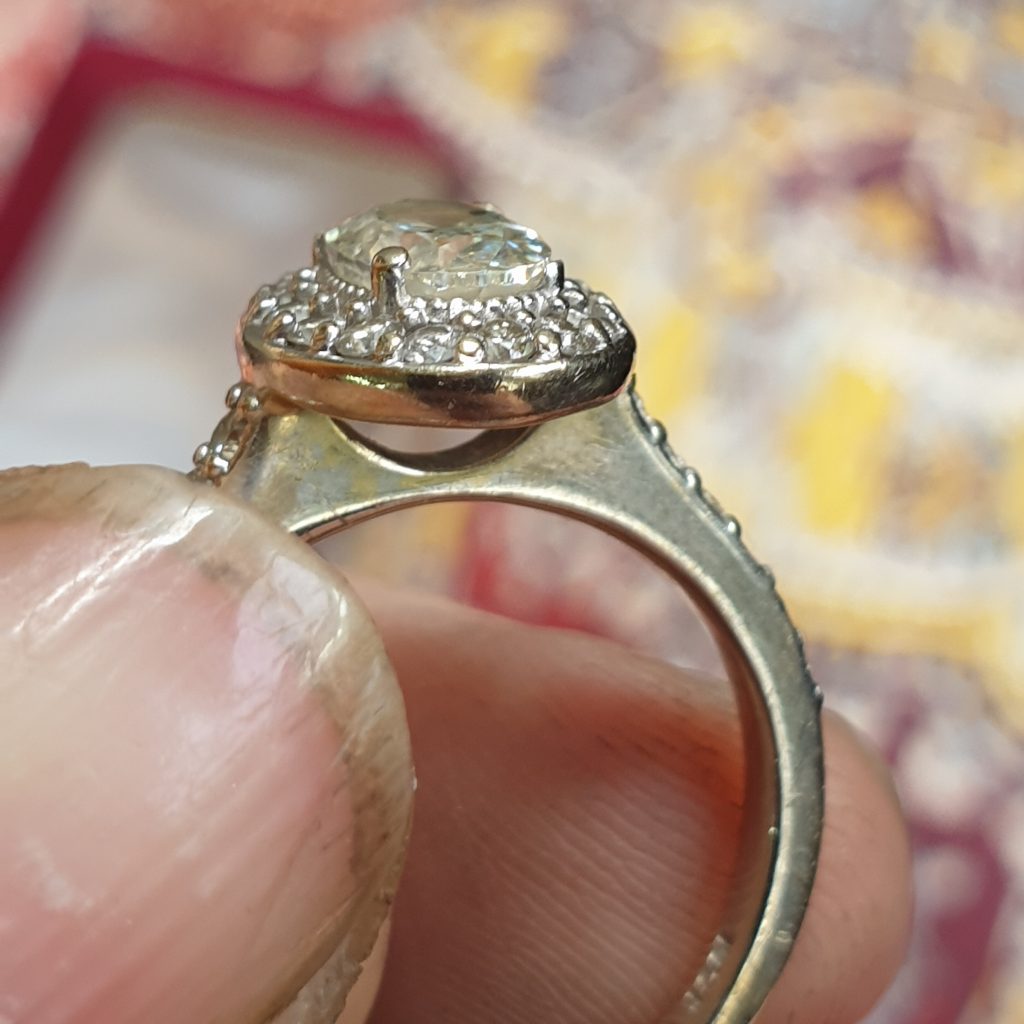
The flash
Smartphones and smaller cameras have integrated flashes that, when pushing the trigger to take a photo, lights up the subject brightly in that moment. A flash used so close to a small subject, however, casts hard shadows, not only on the background behind the piece, but also under claws and other details on the piece.
On more sophisticated cameras the brightness of the flash can be turned down, or the camera can be set to trigger two or more external flashes set up to the sides of the subject, that will cancel out the shadows cast by each other. This technique is only used in larger and more expensive photo studio set-ups.
Instead of using flashes at all, one can opt to light your subject with static lights only, tweaking them to get the best result before the first photo is taken.
Lightboxes and tents
Not just flashes, but direct light of any kind will cast black shadows underneath your jewellery, under stones and claws, etc. Also, the light source itself will reflect sharply on metal surfaces and off the facets of stones, leaving distracting bright spots on your pieces.
There are two ways to combat this. The first is to diffuse the light through the sides of a light tent, the second is to not light the subject directly, but to ‘bounce’ the light off screens or the insides of a light box.
Light tents
Tents are collapsible cubes made from white synthetic fabric that can be bought from specialist photography shops. Tents come in bigger and smaller sizes. The fabric is translucent enough to let through the light from your lamps, but will block out your surrounds so that the rest of the world does not reflect in you metal surfaces.
If you are going to use a light tent, you will probably need more than one light source and bulbs that are as bright as possible. Because light will be diffused through the sides of the tent, you will need a lot more of it to illuminate the object clearly.
Light boxes
A light box is slightly different. The sides are more solid and opaque, and as already mentioned, some are already fitted with LED lights that you may or may not want to use… The insides of light boxes are white or shiny silver. The difference here is that instead of lighting the subject from the outside of the box, your light is shone into the opening at the front, and is reflected off the insides of the box (the walls of the box still block off reflections from the surrounding room, just like the tent).
One major advantage here is that you don’t need as much light to illuminate your jewellery. Even if you just use one bright lamp, the light bounces off the walls from all sides, which help combat hard shadows.
Homemade set-ups
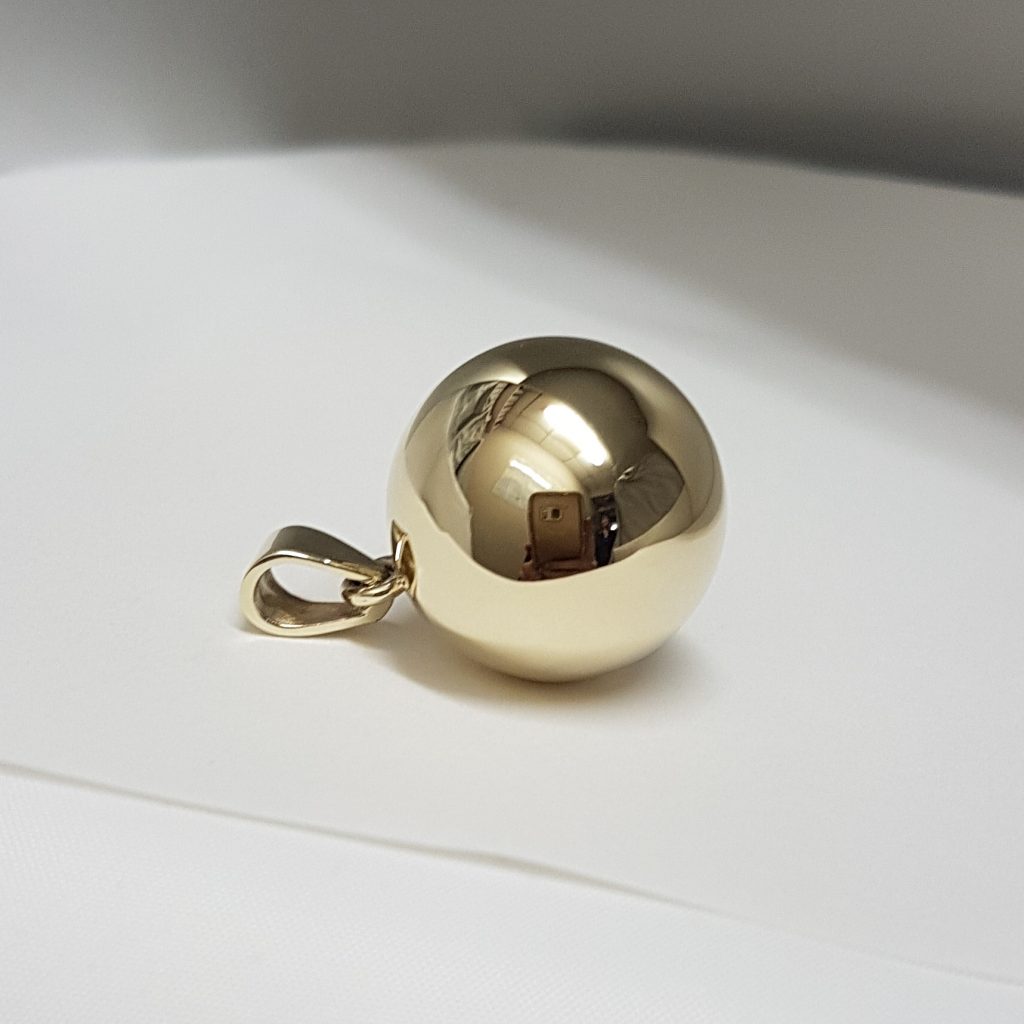
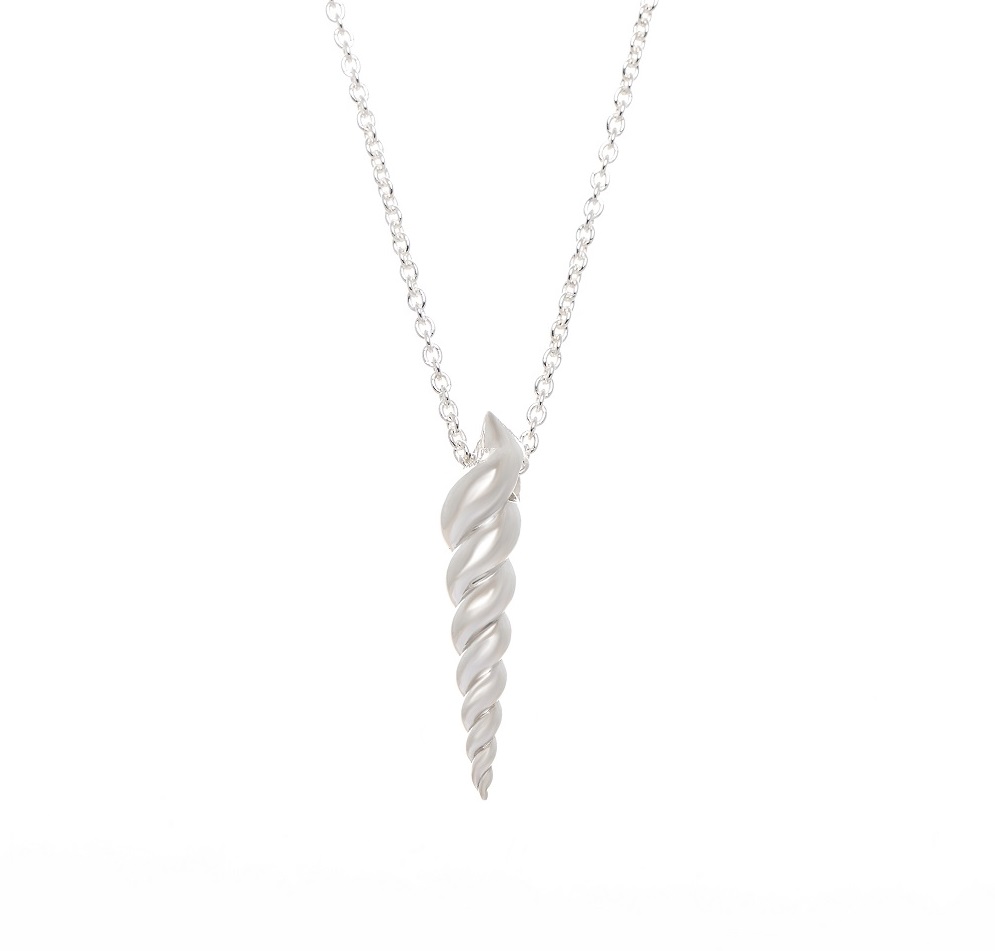
After extensive experimentation with both light tents and boxes that you can buy commercially, I have come to the conclusion that neither is perfect for jewellery photography.
The biggest problem with jewellery is that it is made from highly polished metal and sparkling gemstones. Metal surfaces photographed in a light tent come out smooth, with no hard reflections, but it can also make your metals look more like plastic and completely dull the sparkle on diamonds. Light boxes are better in this regard, but there is a balance that needs to be found between creating sparkle on the gems and metal surfaces that still look metallic, and having distracting black and white reflections that make it hard to see the details of the piece.
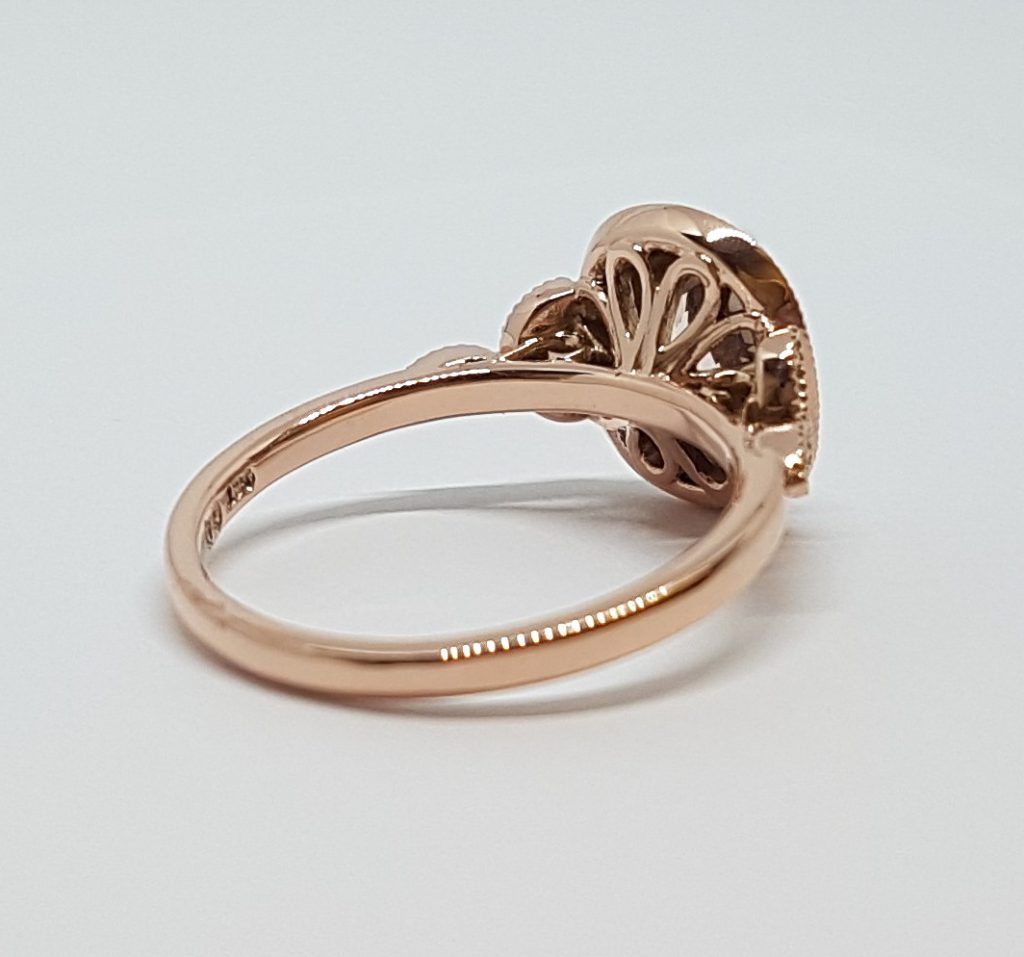
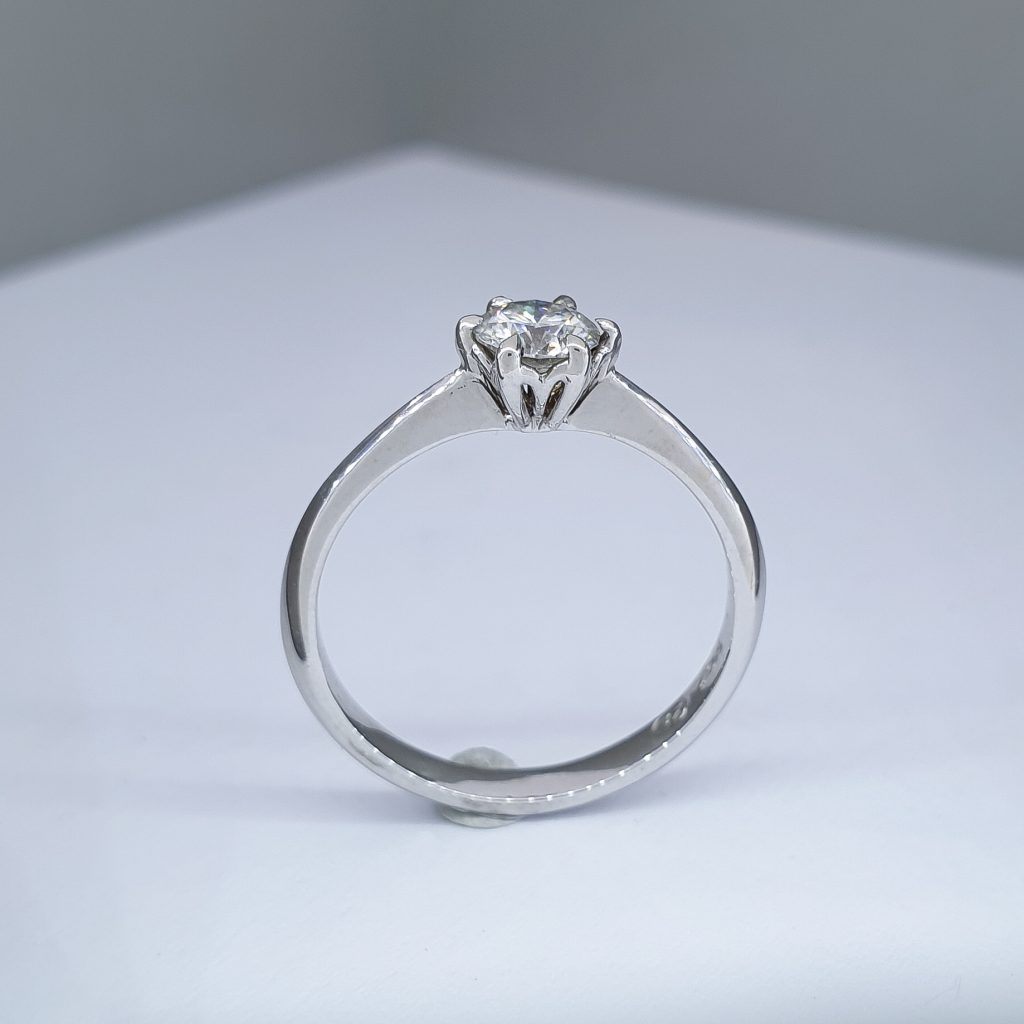
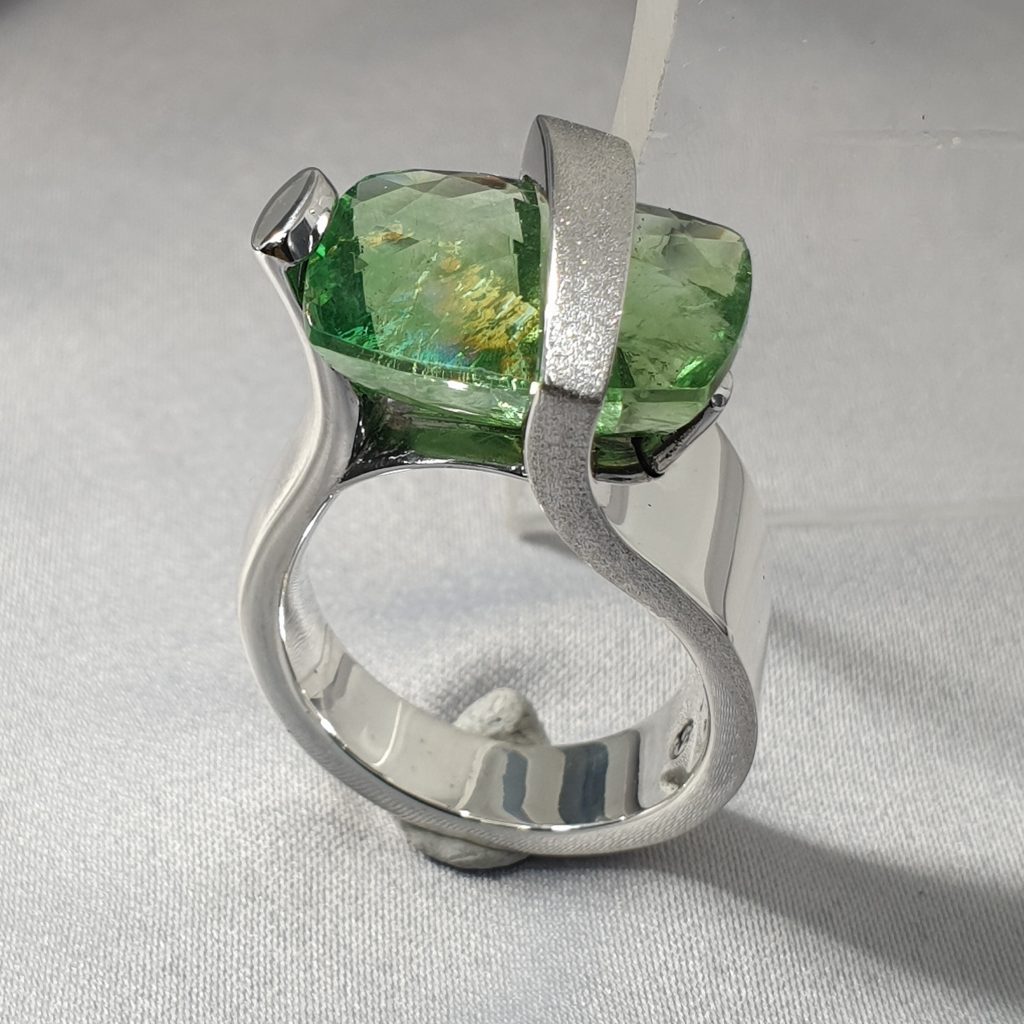
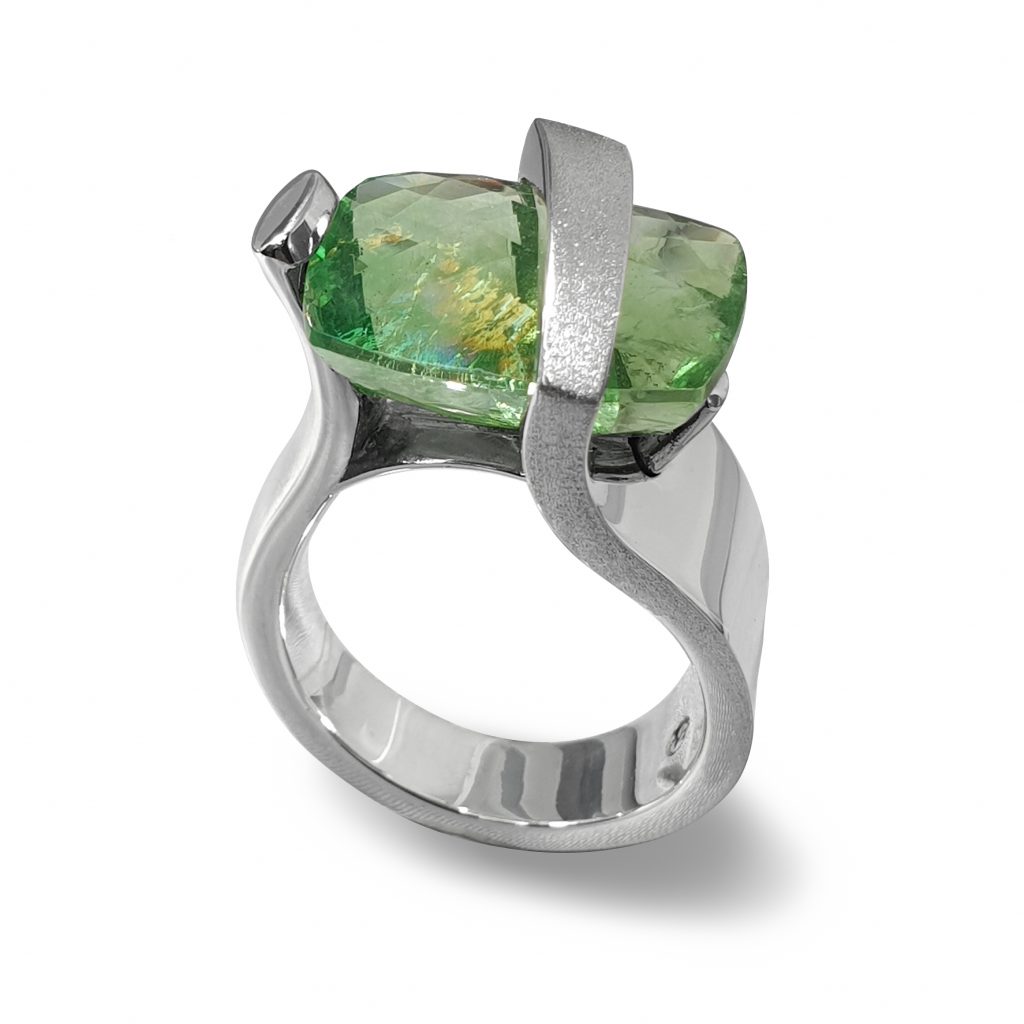
As an example, consider the two pieces photographed below. Both images are of highly polished silver jewellery. Both are clear and professional-looking, but the way in which they were photographed and edited are obviously different. Which style do you prefer?

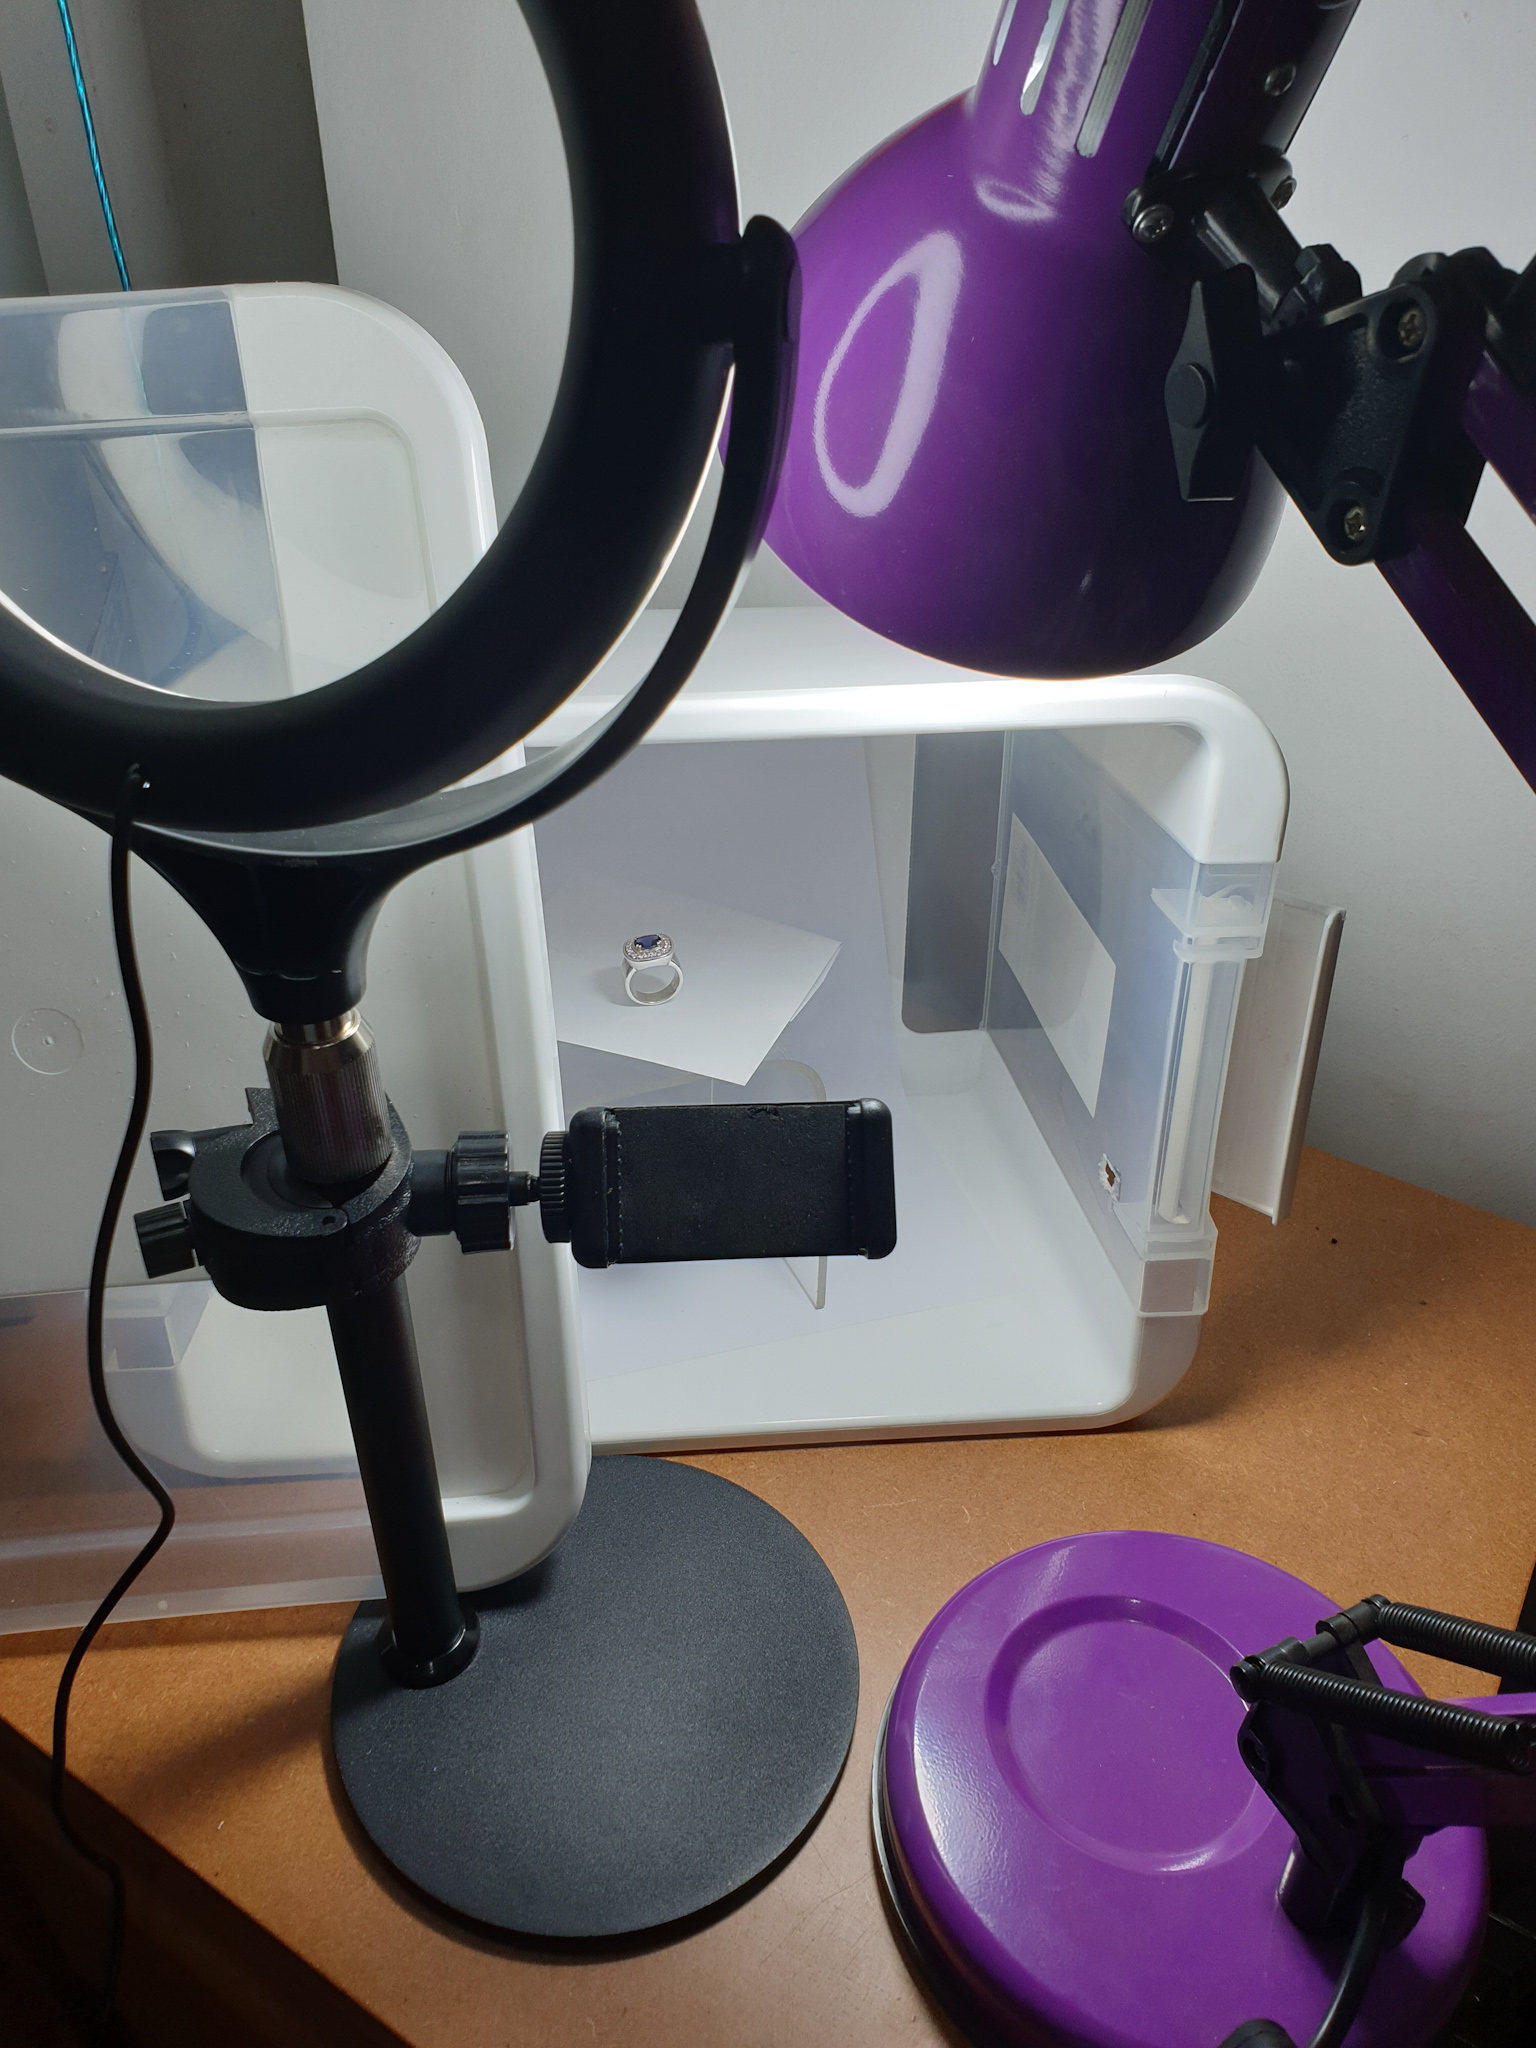
I found that a homemade set-up works very well for the kind of results I want. A medium-sized white plastic container turned on its side can also be a light box. By partially covering the opening of the container with its own lid, hiding the photographer and camera so they do not reflect in the jewellery, and directing light through the rest of the opening, you have a more than adequate light box.
Another good idea is to paint the inside shelf of a cupboard completely white, or to line it with white cardboard, to make it into a dedicated photo-booth. Once again the opening of the cupboard is covered with something like a white sheet with a hole cut in through which to aim the lens of the camera, while at the same time hiding the photographer. The sheet can also be used to diffuse the light from your light source(s). The beauty of this set-up is that you can store the sheet, your lamps, busts, stands, tripods etc. right inside the light box when you are not using it.
Tri-pods
Another important aspect of a good, crisp photo is to keep your camera perfectly still. Because we are taking photographs of very small, motionless objects, it is important to eliminate any blur that can be caused by an unsteady hand. Supporting one side of your smartphone on a surface, or using a tripod or clamp to fix your camera or smartphone at a certain height and angle, will achieve this.
Note: The motion of triggering a photo to be taken, either by tapping on the screen of the smartphone or pressing the button of the camera, can also cause blur. Cameras can be fitted with remote triggers, or a delayed timer can be set, enabling a photo to be taken without actually touching the camera. Smartphones also have a timer function allowing you to capture photos on a delay, though it can be tedious to set up and wait ten seconds for every photo to be taken. If your smartphone can be operated with a stylus, then the stylus can be used as a remote trigger for taking photographs.
Backgrounds
The space surrounding the piece in the photo can either be left blank, as you would for catalogue images, or the space can be used to style a piece, creating a look or ambience for your product. Models and backgrounds can be edited in (more on that in another blog post), or the pieces can be photographed directly with props or on the model.
White backgrounds
For completely blank white backgrounds, one would position the piece on a smooth, white surface. Fine paper would work, or a smooth white Perspex sheet or the plastic lid of a container. Necklaces can be propped up using white or clear blocks, busts, double-side tape or Prestik (Blu-tack). Chains and pendants can be suspended in mid-air using clear fishing gut.
In spite of doing all of the above, it is impossible to achieve a perfectly white background in a photograph, there will always be a difference between the ‘white’ of the background the jewellery lies on, and the white of the screen that this text is displayed upon.
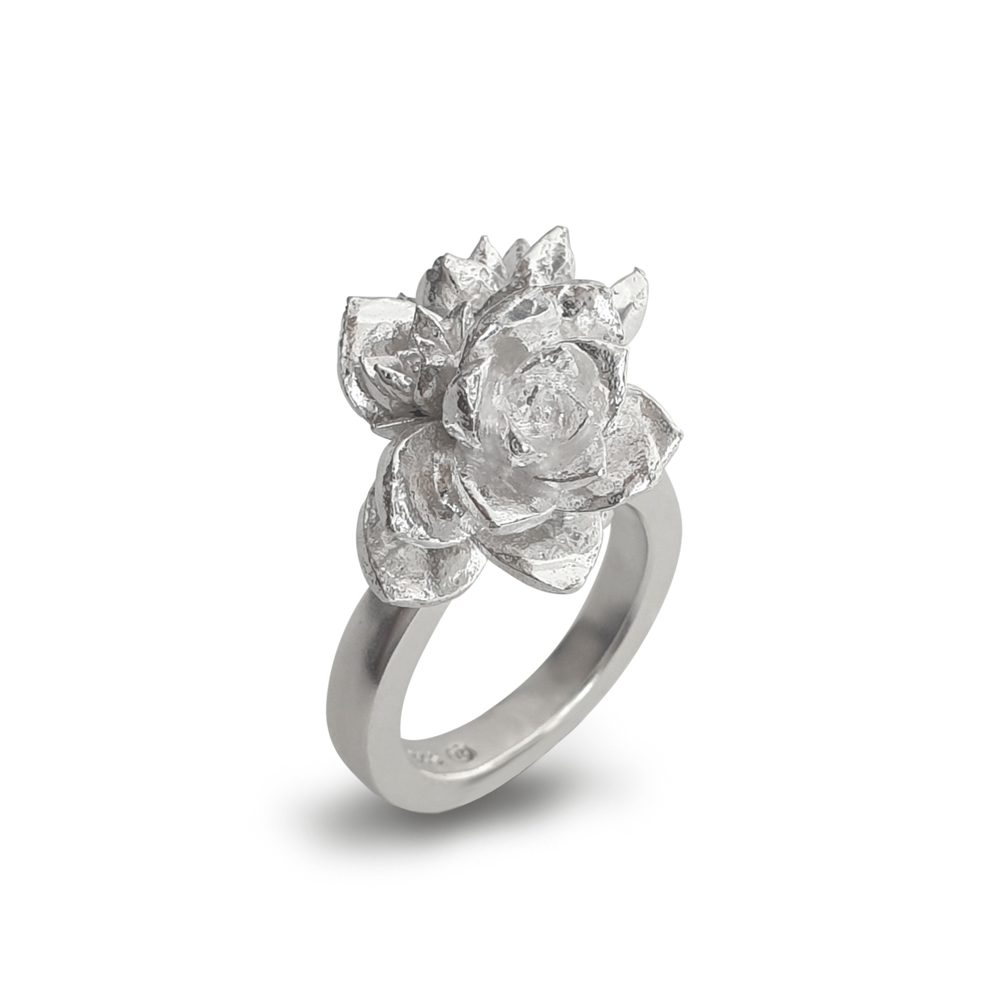
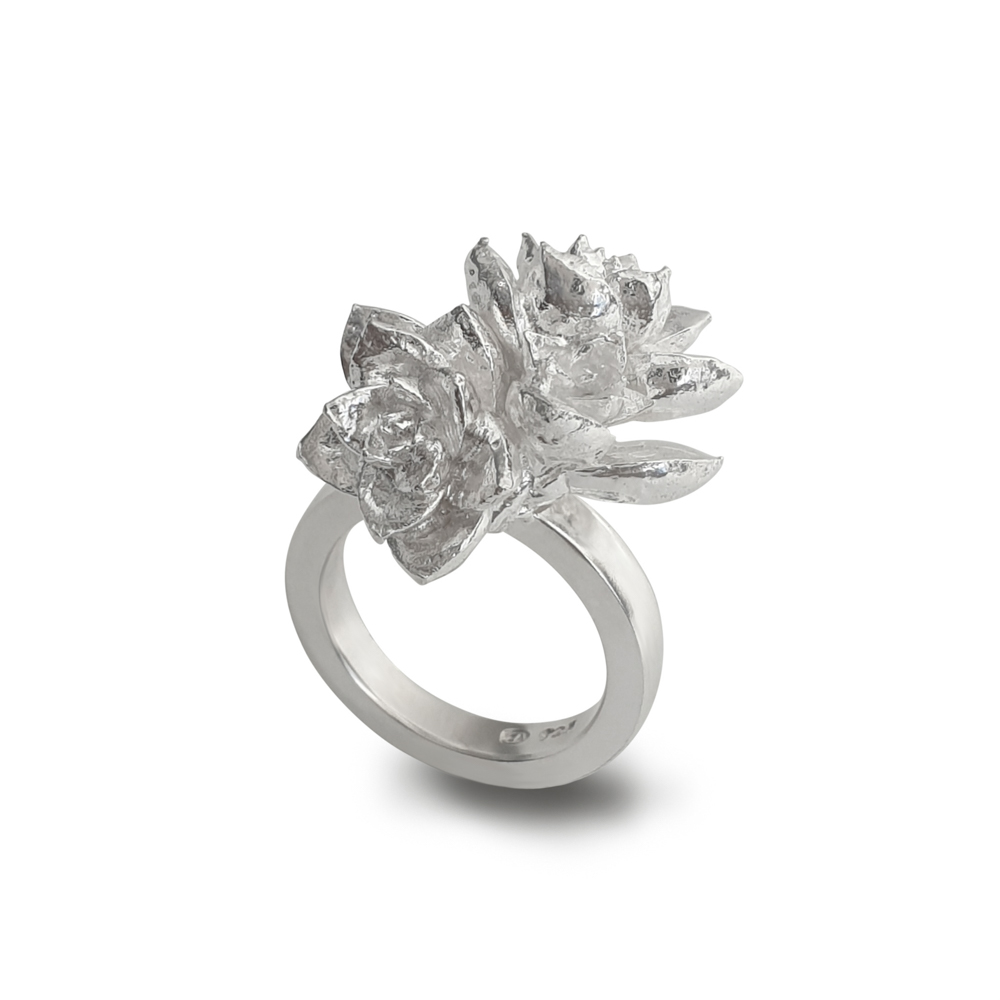
Let us look again at photographs of the Succulent cluster ring. The left photo shows the original photograph, taken in a completely white environment, and the right shows the same ring with the background edited out.
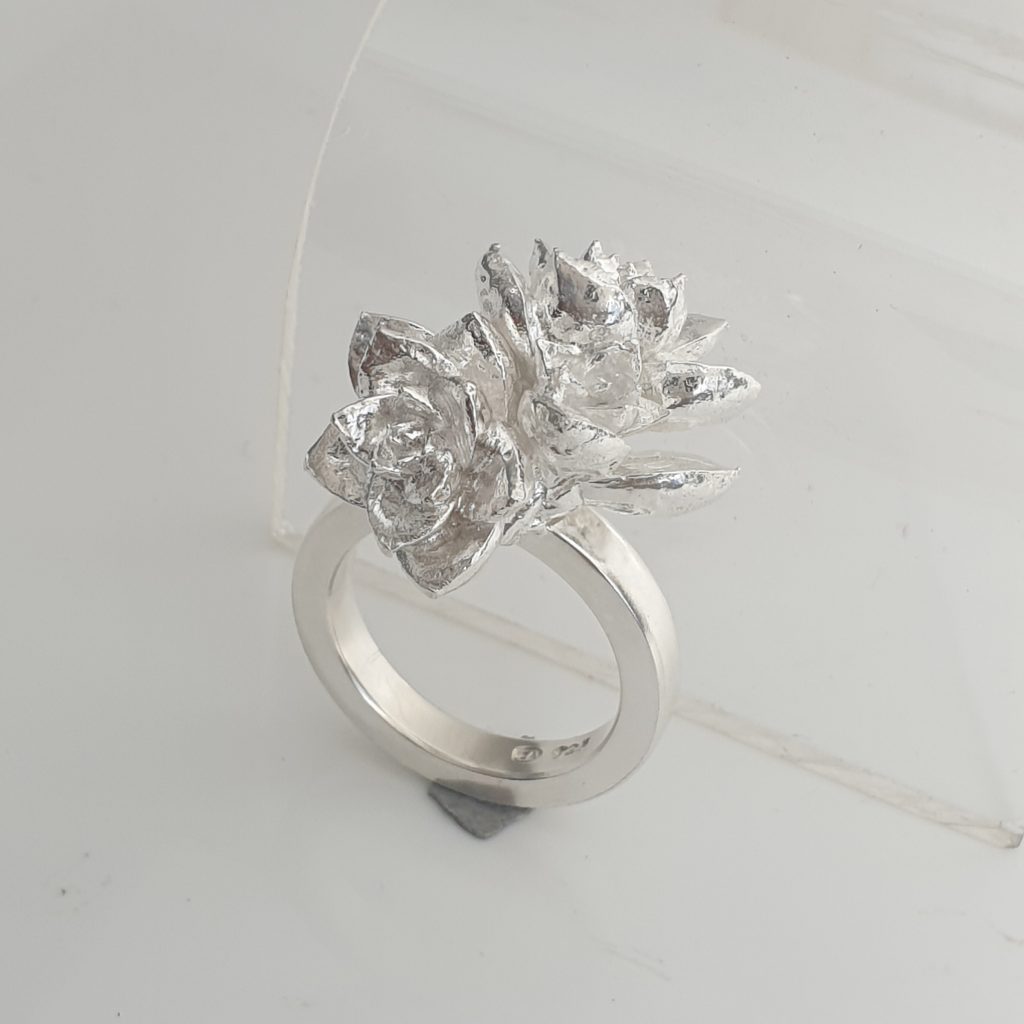
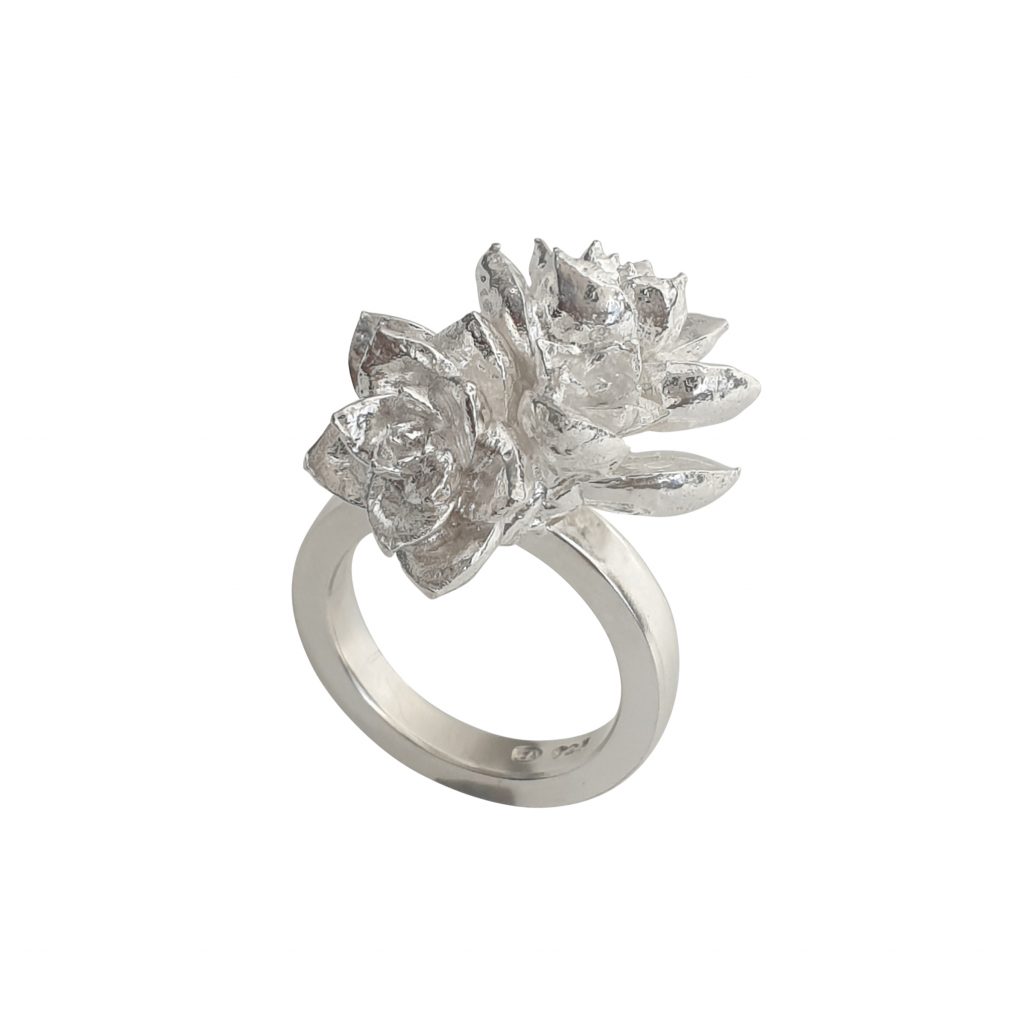
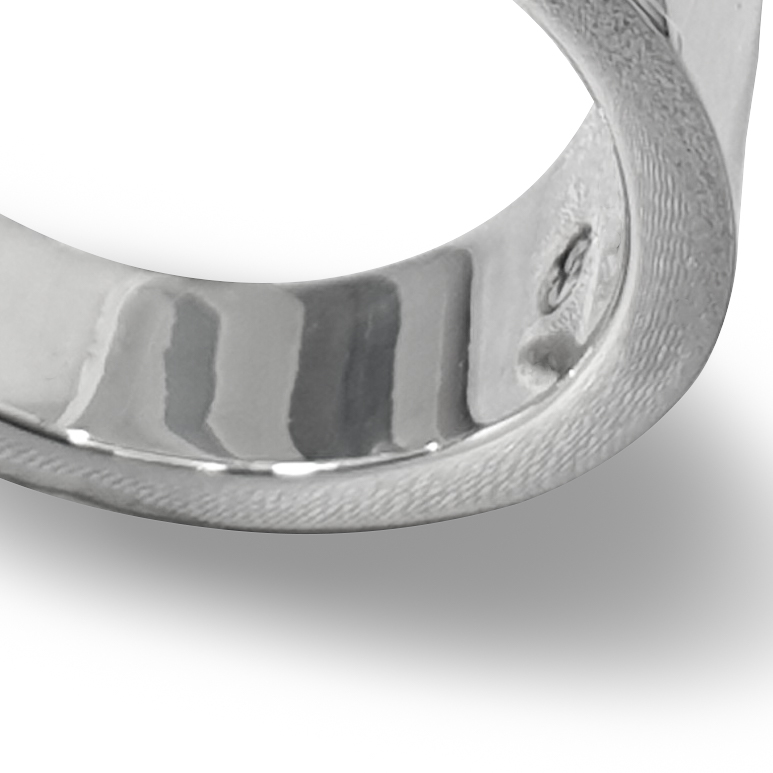
If this is the case, and you have to digitally remove the background anyway, then why care what surface the piece lies on? Once again, the reason is that metal reflects it surroundings. The ring in the photograph below was put on a slightly textured, grey fabric. After the background is removed, the texture is still visible in the shank of the ring. The same would happen if the ring was placed on a coloured surface, with the colour showing up in the ring shank and elsewhere on the piece.
Note: Some jewellers opt for a dark theme on their websites etc. If the background of your photo’s need to be black, even if you will be editing in the black, take your photo’s on a black background so that the reflections in the jewellery are also black.
Coloured and textured backgrounds and props
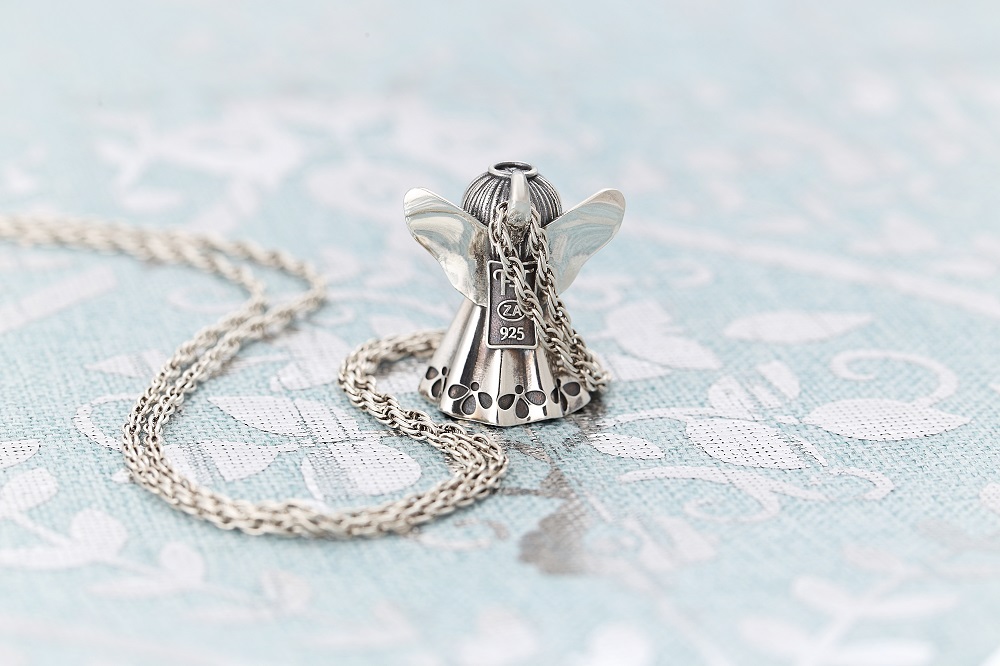
Of course, the above is not really a problem if the intention is to keep the background in the photo. Below, the beautiful blue and textured surface reflects in the highly polished wings of the angel. In this case it is a good thing, as it shows that the pendant is part of its surroundings.
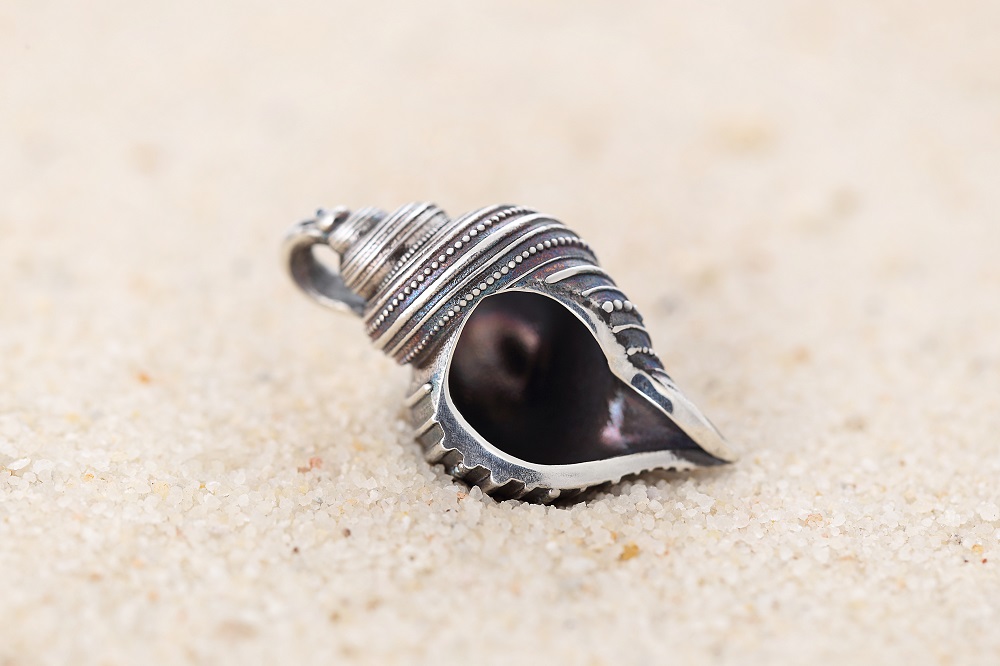
In a way photographing pieces on backgrounds are simpler, because it eliminates the need for time-consuming editing of the background. They can also be fun to set up, because it provides an opportunity to explore themes and be creative. In the photo below, the shell pendant lies on sand. It is an appropriate background for this particular piece, as the background looks like the pendant was photographed on the beach.
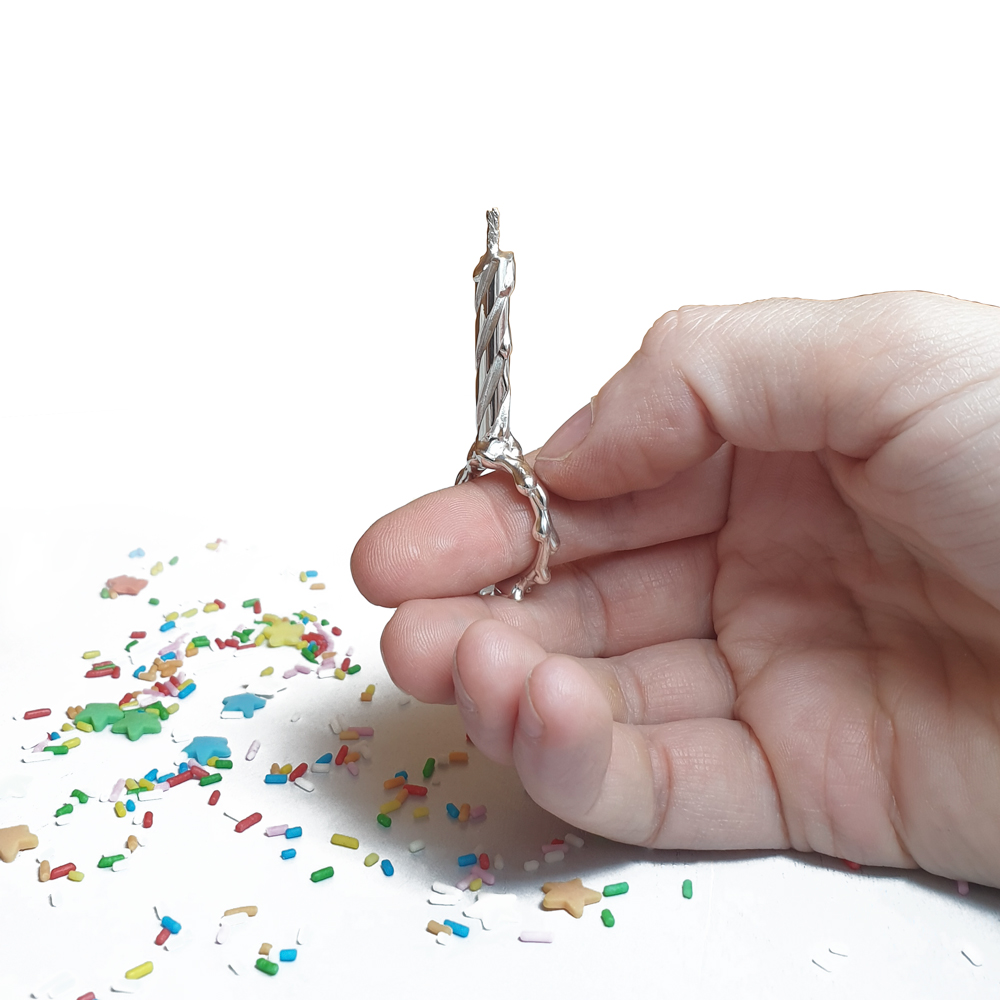
The trick with styled backgrounds are that they should create impact, without distracting from the actual jewellery. I find from looking at other jeweller’s Instagram feeds that props are almost always a distraction to the pieces on display. I truly believe that in most cases, less is more… In the photo below, a handful of cupcake sprinkles is all it takes to invoke a messy after-the-party atmosphere. The rest of the image is still overwhelmingly white.
Conclusion
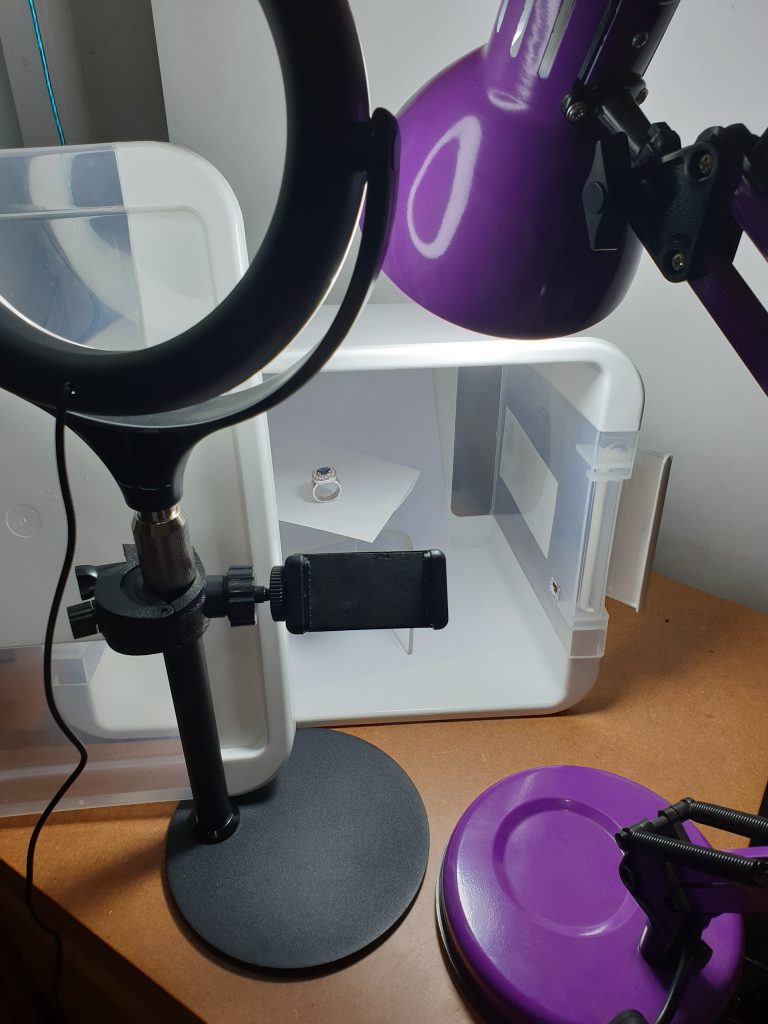
The set-up below is very basic, but it deals with many of the basic requirements for a good photo mentioned above: good light, a makeshift lightbox, a clamp to hold a smartphone steady and a plain white background.
The next step to professional-looking photographs is editing. No matter how good the initial photograph, some editing is always required. The fact is that a ring that measures 30 mm tall in real life can now be viewed at 200 mm tall on a computer screen. Nothing that is blown up that much will look perfect, no matter how good the quality of the product in real life.
At this point you can choose to outsource your editing to an editing company or freelancer, or you can learn to do it yourself, but more on that in the next post…